Requestor Workflow
This guide explains the Requestor Workflow feature in LightMesh, which provides a dedicated portal for users with Requestor access rights to submit network requests for approval.
Overview
The Requestor Workflow is a feature that enables controlled network change management through a separate request portal. Users with Requestor roles can submit network requests without having direct access to the main LightMesh application, ensuring proper governance and approval processes.
How to Create a User with Requestor Access
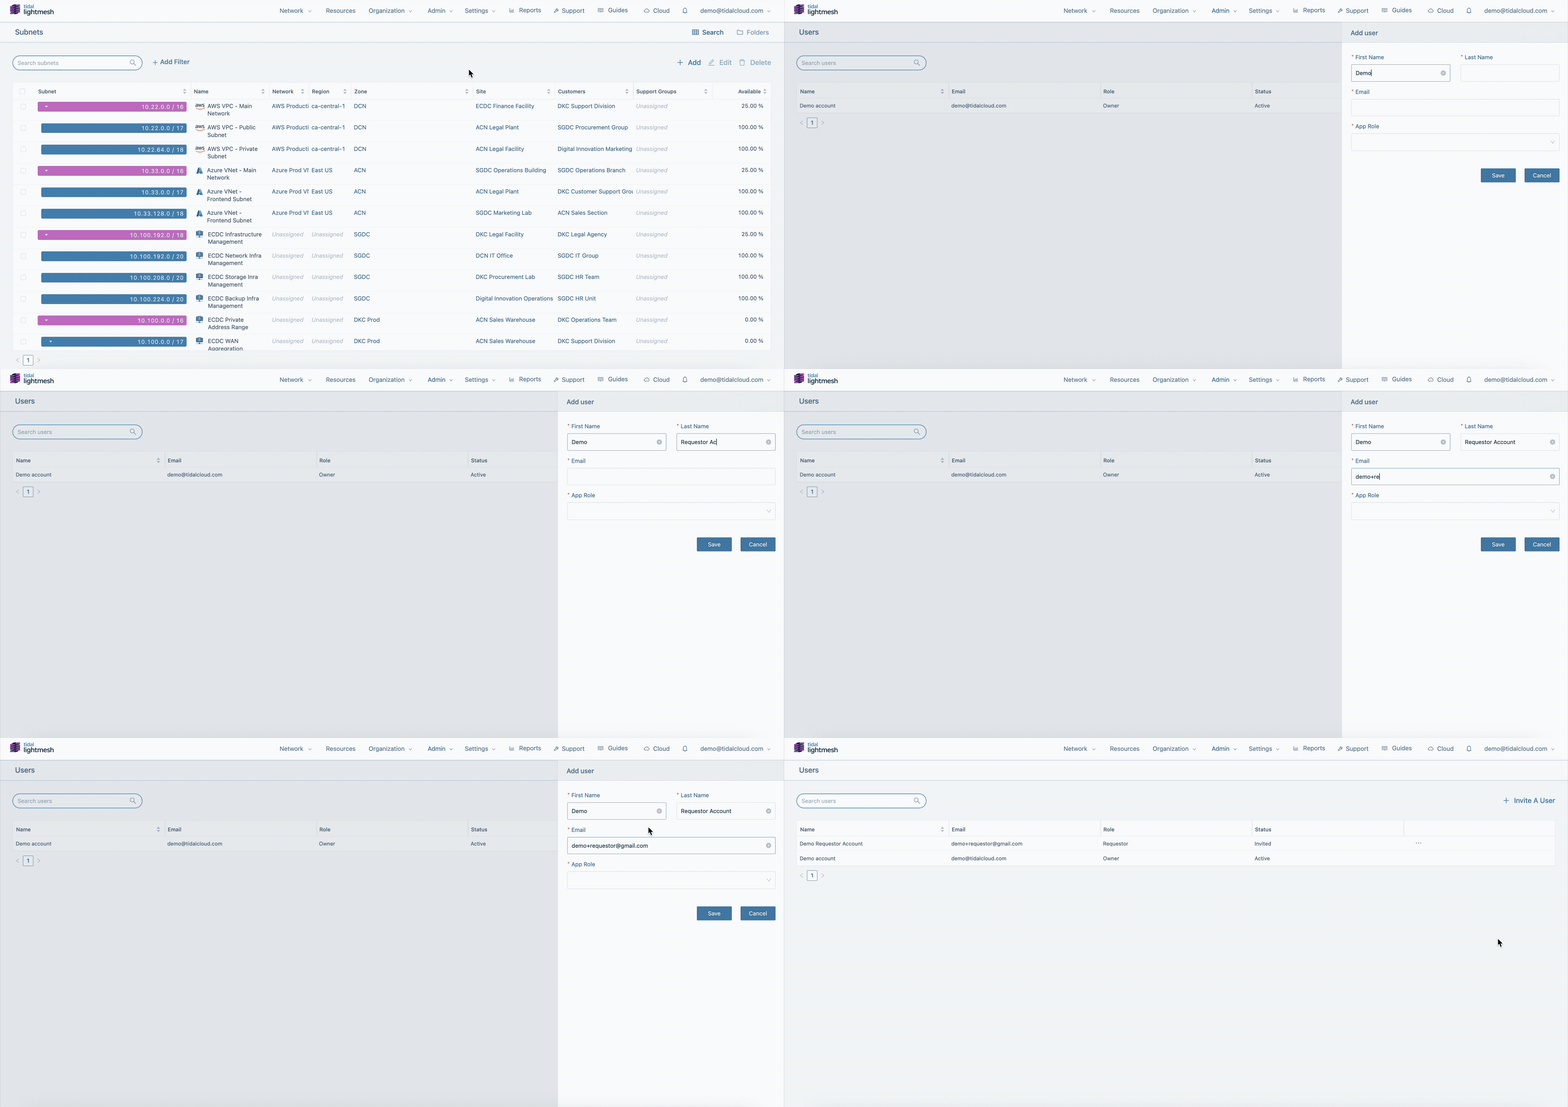
To allow a user to submit network requests via the Requestor Workflow, you must assign them the Requestor role during user creation. Here’s how:
- Navigate to the User Management section in the LightMesh admin portal.
- Click “Invite A User” to begin the user invitation process.
- Fill in the user details (First Name, Last Name, Email).
- Assign the “Requestor” role to the user in the “App Role” or “Role” dropdown.
- Click “Save” to invite the user with Requestor access.

How It Works
1. Request Submission
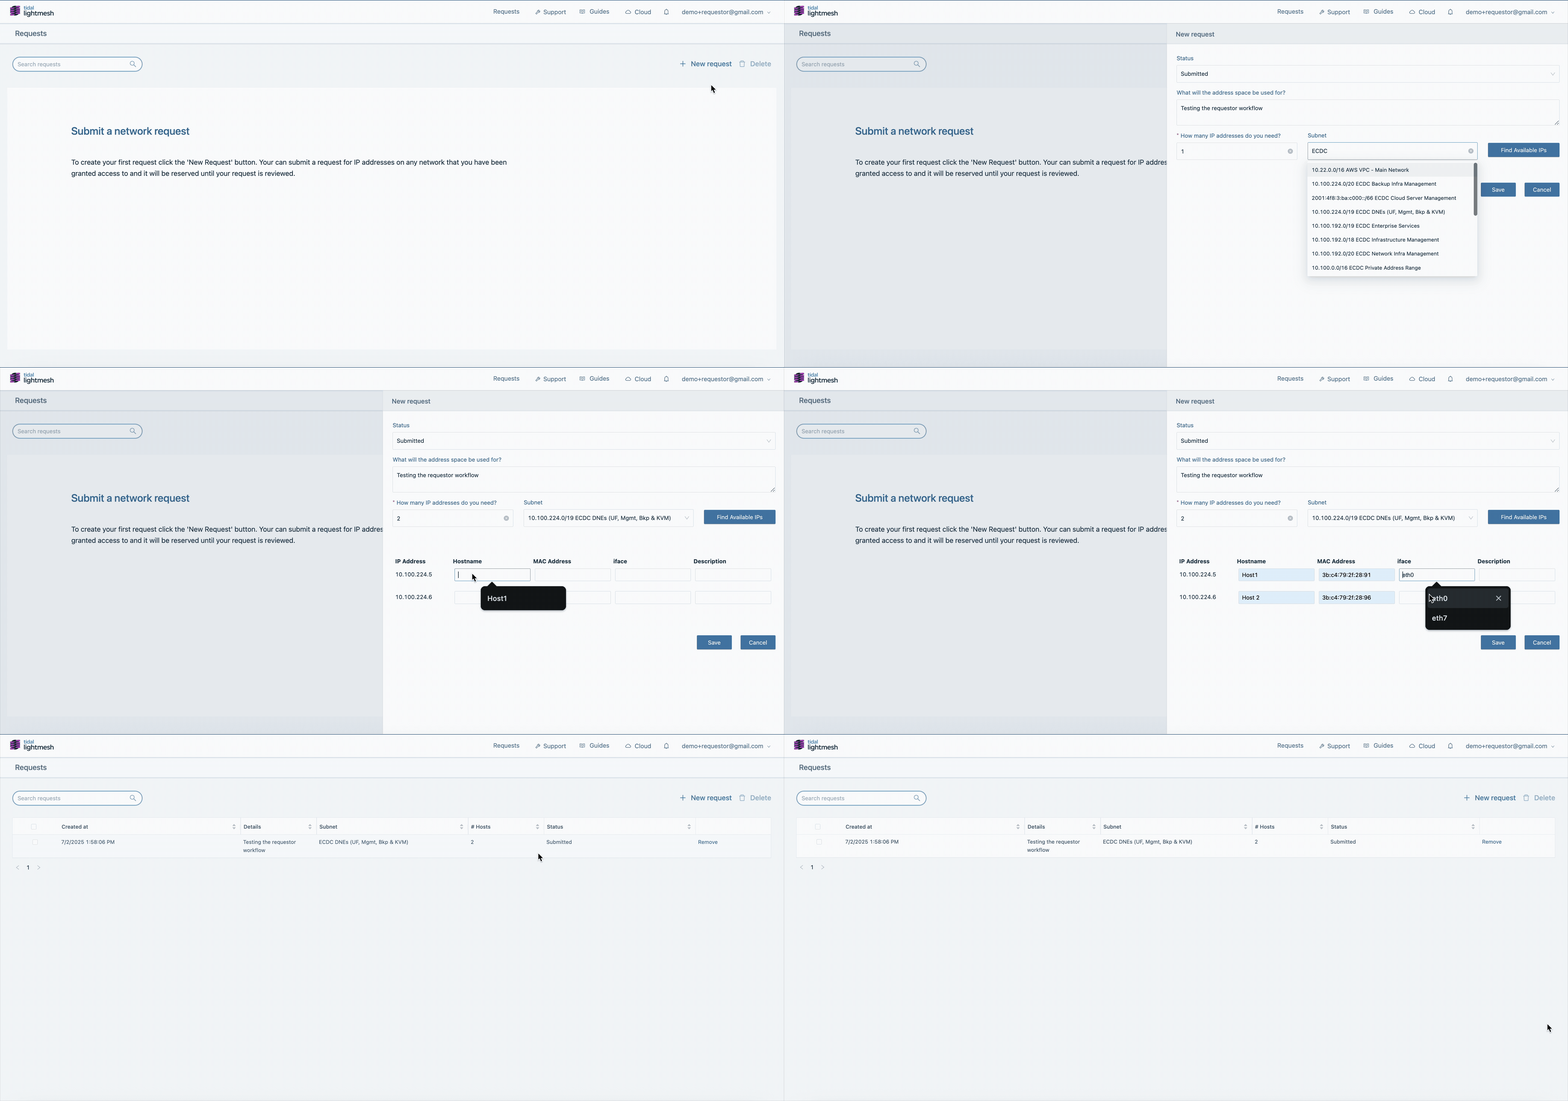
Requestors can submit IP address requests through the dedicated portal. Here’s how the process works:
-
Login : The user with Requestor access logs in to the request portal using their LightMesh credentials.
-
Start a New Request : After logging in, click on New Request. This will open a drawer (side panel) for submitting a new request.
-
Set the Request Status
- By default, the status is set to Submitted.
- If the user is not ready to submit, they can select Draft instead.
-
Provide Justification : In the section “What will the address space be used for?", enter a justification for the request.
-
Specify the Number of IP Addresses Needed : Enter the required number of IP addresses (e.g., change the default “1” to “2” if you need two addresses).
-
Select the Subnet : Use the Subnet dropdown to search for or select the desired subnet.
-
Find Available IPs
- Click Find Available IPs.
- The requested number of available IP addresses will be displayed in the drawer.
-
Enter IP Assignment Details
- For each IP, you’ll be prompted to add:
- Hostname
- MAC address
- Interface
- Description
- For each IP, you’ll be prompted to add:
-
Submit the Request
- Click Save to submit the request.
- The request will be immediately submitted for approval.
-
View and Manage Requests
- After submission, you’ll be routed to a page listing your submitted requests.
- To update a request or change its status, simply click on the record.
The drawer will open again with all details pre-filled for editing.
Tip: You can save a request as a draft if you’re not ready to submit. Just change the status before saving.

2. Approval Process
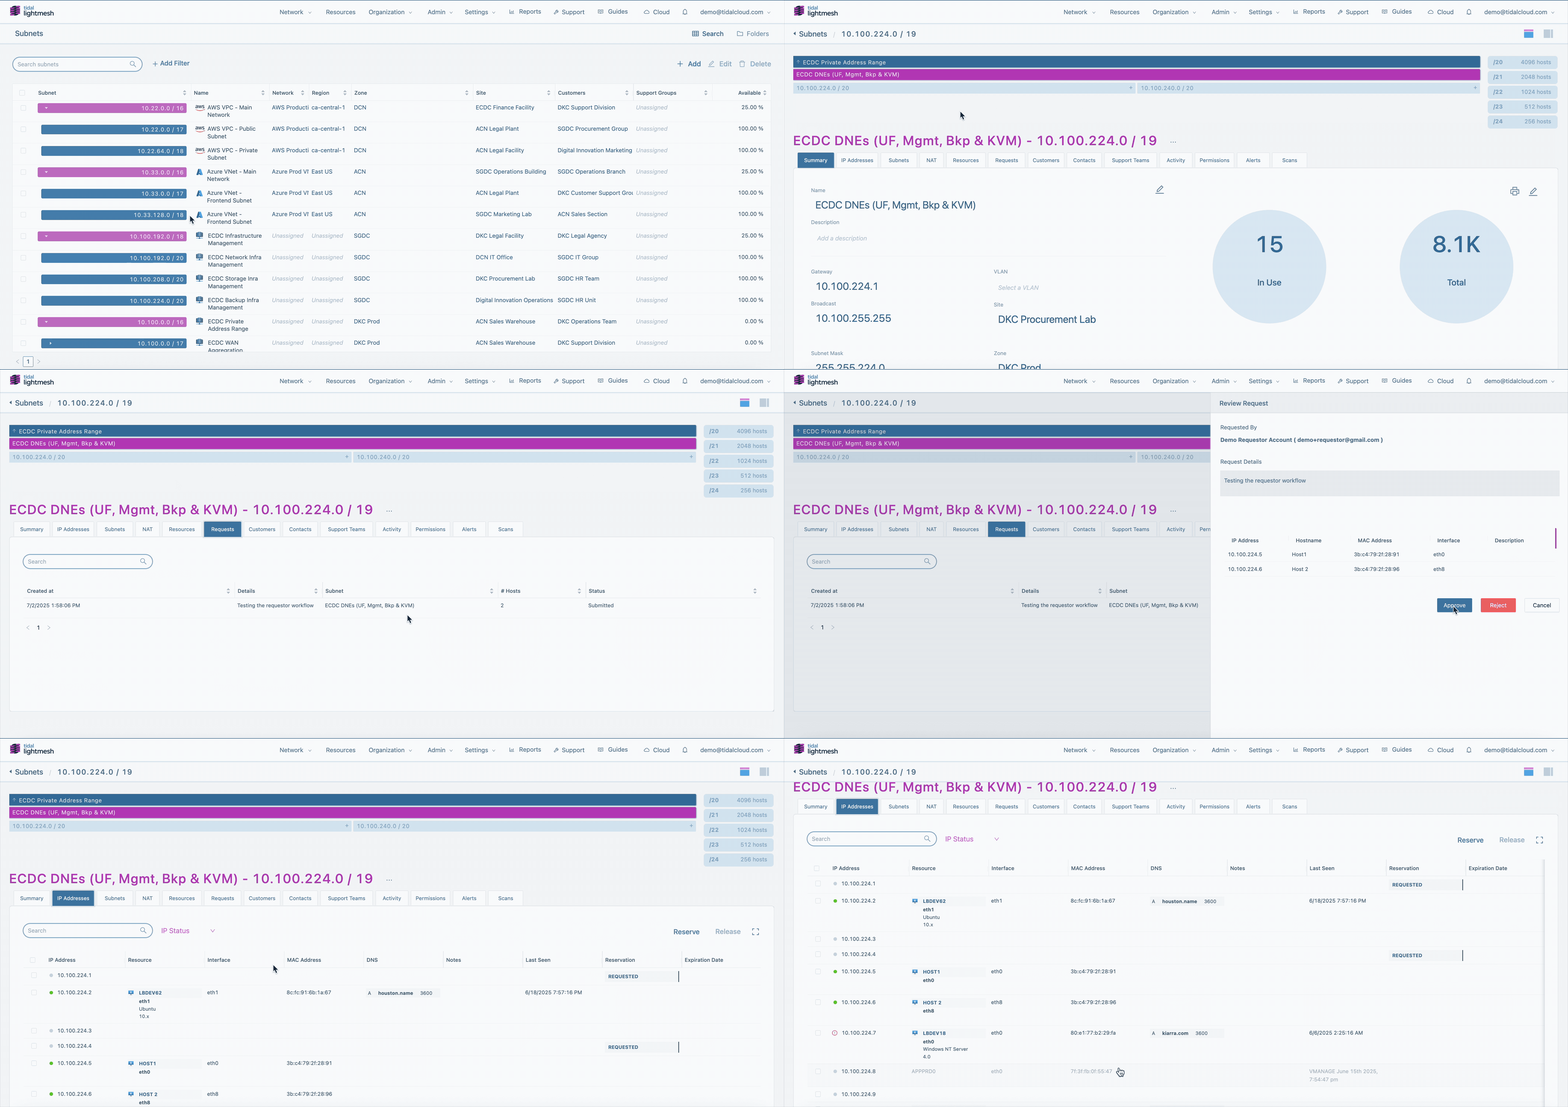
Once a requestor submits a network request, the Owner or Administrator can review and take action on it:
-
Login : The Owner/Administrator logs in to the LightMesh portal using their credentials.
-
Find the Relevant Subnet : Search for the subnet for which the requestor has submitted a network request.
-
Go to the Requests Section : Once inside the subnet, navigate to the Requests section.
-
Review the Recent Request : Click on the most recent (or relevant) request. This will open a drawer with all the request details.
-
Verify Information : Review the submitted information (description, requested IPs, hostnames, etc.).
-
Take Action :
- If satisfied, click Approve to approve the request.
- If not, click Reject to deny the request.
- To leave the request pending, click Cancel to close the drawer without taking action.
-
Check IP Assignment : After approving, go to the IP Addresses section to verify that the IP(s) have been properly assigned.
Tip: Approving a request will immediately assign the requested IP addresses. Leaving a request in pending state allows for further review or follow-up.

3. Implementation
- Approved requests are automatically implemented in the LightMesh system
- Requestors can see the status in their portal
Benefits
- Governance: Ensures all network changes go through proper approval processes
- Security: Limits direct access to network management while maintaining efficiency
- Efficiency: Streamlines the request and approval process through automation
- Transparency: Clear visibility into request status and approval decisions
Support
For assistance with setting up or using the Requestor Workflow:
- Contact your LightMesh administrator
- Reach out to Tidal support through the LightMesh application
- Email support@tidalcloud.com for Enterprise support
Note: The Requestor Workflow is an Enterprise-only feature. Contact sales@tidalcloud.com to learn more about upgrading to the Enterprise plan.